Making Precision (Scientific) Instruments in the 17th, 18th, and 19th Centuries
Precision machine design is as old as metalworking, dating back to the bronze age, forward to the watch and clock makers, and then to the scientific instrument makers. Today, watch makers still use many of the classical techniques, although powered tools have made a huge impact on repeatability and precision. The question naturally arises: how did people make things out of brass and copper before we had powered machine tools?
The purpose here is to consider the fabrication and/or machining of various ornamental, engineering, or scientific devices throughout the 18th and 19th centuries. The devices under consideration will be on the smaller scale, so e.g. architectural manufacturing processes are not considered. This is particularly concerned with scientific apparatus of these centuries.
Some resources:
- Durham's The Artificial Clock-maker (ca. 1696)
- Saunier’s The Watchmakers’ Hand-book (1888)
- This page: https://watchmaking.weebly.com/the-turns.html
- Gee’s The Silversmith’s Handbook (1886)
- This page: https://www.history.org/foundation/journal/Winter03-04/foundry.cfm
- This encyclopedia (in French) which has hundreds (thousands?) of articles on metalwork in the 1750s
- This article is interesting, “Reading, Writing, and Making in the 18th-century Instrument Trade”
Youtubers that work with conventional tools:
- Clickspring
- Uri Tuchman
- Science Museum, Shaping Science series
Materials
The materials most often used were:
• Metals
◦ Brass
◦ Iron
◦ Steel
◦ Platinum
◦ Other
▪ Zinc, copper, palladium, silver, gold
• Glasses
• Wood
• Organic materials
There are a wide variety of techniques used to shape these materials, depending on the material itself, and the form which the material takes (e.g. sheet metal, round metal stock, flat metal stock). Throughout the fabrication process, various stages can be found (e.g. roughing, fine machining, and finishing). We’ll cover these as quickly as possible.
Forms of materials include:
• Metal
◦ Sheet
◦ Extrusion
◦ Bar
▪ Flat stock
▪ Round stock
▪ Hexagonal
▪ Etc
◦ Ingot
• Glass
Metalworking Tools Through the Ages
General Metalworking
Many principles of metalworking apply to silver, brass, and the like, and so they can be considered together. Three broad types of metalworking will be considered:
I. Casting
II. Solid metal working
III. Sheet metal working
As the industrial revolution brings machines such as lathes into common use, a fourth type emerges,
IV. Machining
Wherein a piece of stock is machined using a foot-powered, hand-cranked, steam-powered, etc automatic machining tool with a cutting tool attached.
Other processes which are used in conjunction with the above include engraving, welding, soldering, and brazing.
Brass Working
A terrific reference on the topic of brass sheet metalworking (in the context of musical instruments) is found here. John Fuller’s Art of Coppersmithing (1891) is a reference for mid- to late-1800s copper sheet metalworking into many shapes. As for solid parts not from sheet, a variety of methods could be used.
Some of the techniques used for thousands of years:
• Casting
• Forging
• Filing
• Hammering (raising, planishing, chasing, repousse)
• Engraving
• Soldering
• Drilling
• Riveting
• Sawing
• Bending
• Sheet-working processes (see above references)
◦ Spinning
Of course, these techniques have not looked the same over the centuries, so it is worth further considering how it was all actually done.
Cutting Operations
There are a few ways that brass, copper, or bronze could have been cut. The method depends on the length of the cut, the shape of the cut (curved, straight), and the thickness and shape of the material. The operations of engraving are essentially cutting operations, using a sharp point and hammer to cut the surface of the material. Engraving can be repeatedly performed to achieve precise, repeatable slots in brass plates. The tools of engraving are more or less particular types of cold chisel. A cold chisel and a heavy hammer could be used to perform large, rough cuts. Saws for cutting metal have been in use for centuries, even millennia; when the popularity of steel grew, saws capable of cutting brass would have become available. By the late 1600s, coping saws would come into use, likely for woodworking, but metalcutting saws in the same shape could have been used for brass. Finally, drilling is a method of cutting which has been in use since antiquity, which is familiar to all.
For cutting of solid materials, there is the practice of cold chiseling of the metal. This can be seen for example in this video from AvE. This would have been one of the most useful methods available to a metalworker. A little more information can be found on this wiki page. I’m still looking for other resources on how these tools were used in the past to achieve various shapes.
Closely related to cold chiseling is engraving. In the following image, an engraver’s shop circa 1755 is shown.
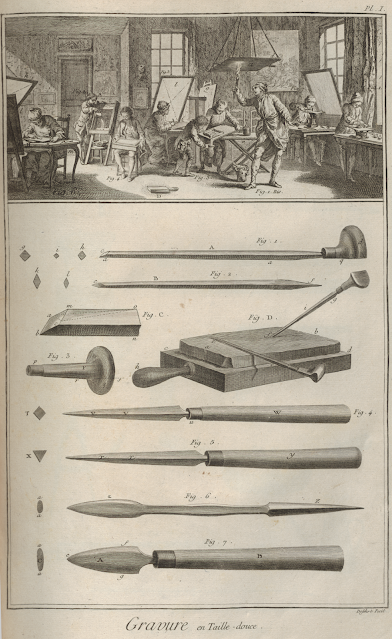
Figure. Engraver’s shop and several tools. [link]
From this image, we see roughly how engraving was performed. The style of cutting tool shown is called a burin (french for a chisel), also known as a scorper, or scauper, or graver, and it has been in use for as far back as antiquity. The body is hardened steel, in a square or circular shape typically, ground down to a point, which is placed on the work. The graver is hammered on the handle, fairly lightly, and repeatedly, tracing slowly the desired design. An example of engraving a sundial (essentially a scale) is seen in this video from Science Museum.
A graver fixed on a jig could be repeatedly drawn over the same surface, gradually cutting through the metal. An example of this is shown in this video from Clickspring.
For drilling, the pump-drill has been in use since prehistory, and has been applied to metalworking since the development of steel drill-bits. Early drill-bits were shaped like arrowheads, from flint chert, or other stones (typically those with conchoidal fracture). This general shape was carried on to metal drill bits, and you can see an example of a pump-drill and its drill bits in this video from Clickspring.
A relating drilling technique can be seen in this video, showing what the poster calls a machine a percer or a percer droit (drill press)
Sawing shares a similar history to drilling. Saws for metalworking would have been hugely useful. The history of the coping saw (and its close relative the hacksaw when the distinction is made) extends to the mid-16th century, most likely applied to woodworking, and it is likely that similar saws were in use for working of soft metals. This is no coincidence: many of the techniques applied to hard woods apply, albeit in a slightly modified manner, to soft metals such as brass.
It is no surprise, then, that woodworking lathes (in use for thousands of years) would be repurposed to turn brass, copper, and other soft metals. It is certain that turning was used on metals as early as the 1750s, as an entry in the ARTFL Encyclopedie on turning lists turning tools used specifically for copper and stone. Ptolemy, in his Algamest (ca. 150 AD), mentions turning on a lathe as part of making his 'astrolabe', today called an armillary sphere. I haven't found what material this instrument was made from, and it may be unknown, but it's likely it was made from wood, paper/parchment, or brass.

Figure. Turner’s shop, circa 1755, showing a lathe and a few fixtures.

Figure. Turning tools used with a lathe. Figures 14-26 are specified as “lathe tools for copper, wood, stone, etc.”
A watchmaker's lathe is shown in this video by Bakkendorff, undated, used to make a pocket.
The operation of grinding, using a grinding wheel, or files, etc, is a highly important technique for shaping, smoothing, and finishing. Files are still broadly used in metalworking today, and they have been available for millennia. Examples abound, but I've rarely seen a more beautiful explanation than that provided in this Clickspring video.
Possible Workflows in Historical Metalworking
Now that the processes available are understood, it is worth considering how they were used in conjunction with one-another to achieve a desired shape.
To begin, we must have material. The brass was obtained from founding, then casting, forging, and/or raising. If the desired shape could be cut from a plate or sheet, such raw stock could be obtained by hammering, or raising. This is the classical way for both brass plate, and for brass sheet. Passing material through pair of rolling wheels became a far more applicable method towards the pre-industrial revolation era. If the material is too thick for cold working, it can be forged, or cast. Grinding could be then used to clean the sheet or plate and to give it a reasonable finish. If the stock desired was a rod, then casting would be preferred, followed most likely by passing material through a die. Rough round stock could also be obtained by hammering, hot or cold, but this would not leave a clean finish, nor would the rod necessarily be straight.
For more complex shapes, or shapes which are difficult to create from flat or round stock, casting was used to get a rough shape, followed by chiseling, drilling, sawing, or grinding, to remove artifacts of the casting process and to provide a surface finish. Casting would require creating a mold, and so it was well suited to mass-production, such as production of candlesticks. Ornamental work was very frequently cast as well.
Pieces which were axially symmetric (cylindrical) may have been cast as described above, or turned on a lathe, depending on what was most expedient. When the shapes became more involved, the piece could be assembled from multiple components, press-fit, soldered, or riveted together.
Tubing could have been created from sheet by rolling the sheet once and soldering or cold-hammering it upon itself. Components could have been created by drawing as well.

Figure. A scientific instrument maker’s shop, showing, among other things, a trammel (fig. 3), and a die (fig. 6). [link]
Printing on Brass: Precision Dials, Rules, Gauges, and Numerals
- Acid etching
- Hand engraving
- Stamping
Glasswork
There are countless videos on YouTube featuring glassblowing as well. I'll add links as I find some that are particularly relevant.
Examples

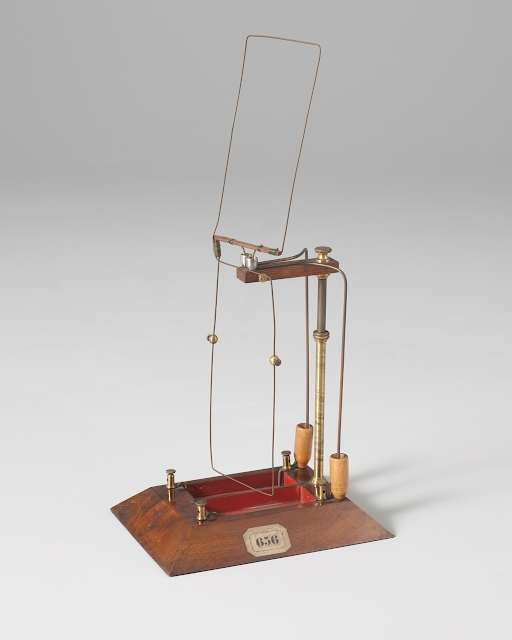


Figure. A Thompson electrometer.

Comments
Post a Comment